July 26, 2012

Paint! And Stuff.

We appreciate a dollar saved.  A lot.  I mentioned a few days ago that we saved hundreds of dollars by painting the pulls.  So even though we ordered new hinges (remember, so yours truly wouldn't cringe each time a door was opened due to the scraping of paint), we scored a killer deal and saved boat-loads.

So if you're looking to make a quick update to your kitchen, bathroom, or dresser, don't purchase new hardware - paint it!  Our new best friend is Rustoleum spray paint.  We used Hammered Silver for the kitchen pulls.

 Several coats later and we had a nice "hammered" look. 
 For about a gazillion other little projects, we've been using Rustoleum Metallic.  The silver below is not what we used, but I apparently misplaced the correct color.  While the Metallic Silver is nice (we initially planned on using it on the kitchen pulls), we decided that the sparkles would look cheap.  So even though our method was cheap, we didn't want it to look it.
 Metallic Oil-Rubbed Bronze.
On a whim, Daniel taped off the bathroom faucet and gave it a few quick coats.  I'm fairly certain we saved at least $100 with this mini-project.
  
 Finally, to update one of our sweet little white chairs, I gave it a quick coat of sunny yellow.
 Pre-painting.
Sweet little yellow chair.
So cheery.
With only a few days of summer left, who knows what other mini-projects I'll be tackling.  Any suggestions?

Happy rainy day!

July 25, 2012

Painting Kitchen Cabinets: Part 2

Here are the nitty-gritty details of how we painted our kitchen cabinets.
 First, the process that DIDN'T work.  I had spent 7 months researching the process, and I really felt like what I nailed down was going to be great.  Not so much.  Here is what mom and I did for 2 days:
1.  Sand doors and frame (using electric sander)
2.  Use liquid sandpaper to wipe down all doors and drawers (also called deglosser)
3.  Latex primer - Benjamin Moore Advance Water Alkyd Primer - tinted to "Distant Gray" - this is when we realized that our method was not working.  (Due to my intense frustration, I took no pictures of this process.)  Here's what happened, in words:  not only was the grain of the wood showing through, but it was showing through yellowed.  Yuck and yikes.  And no amount of latex primer would cover it up.  We tried a stain-blocking latex primer, and it still didn't work.  There are several reasons why our method failed us.  First of all, the areas that we didn't degloss (because we plum forgot) were especially stain-happy.  However, even the doors we had deglossed were riddled with stains.  The bottom line is that a latex primer does not cover stains.  After 3 coats of latex primer on many of the surfaces, I crawled back to Benjamin Moore and admitted that I needed to purchase the oil-based primer.  They kindly obliged and even gave us a new process to try.
 SOOOOOOO.......this is the final process we used to paint the kitchen cabinets.  Thankfully we broke the space into two areas - the island and the desk were part A and the rest of the cabinets were part B.  So the only space that we painted a gazillion times was part A. 
1.  Remove all doors and drawers (we kept the drawer fronts connected to the drawers - it made it tremendously simple to paint the drawer fronts)
2.  Remove hinges and pulls (we later decided to purchase new hinges and paint the pulls)
3.  Liquid sandpaper (deglosser) - after listening to the advice of my new Benjamin Moore besties, we opted not to sand part B of our kitchen.  I was nervous about it at first, but not only did it remove a step, but the deglosser really did function as liquid sandpaper.  We used paper towels to degloss every surface.  It's important to note that the deglosser "opens" the grain of the wood and allows the grain to accept a primer, so the "window of openness" is relatively short - 3-4 hours at most.
4.  Oil-based primer - Benjamin Moore Cover Stain Primer - we probably should have done 2 coats, but we only did 1.
5.  Latex paint - Benjamin Moore Advance Water Alkyd Satin in "Distant Gray."  Paint one side of the doors, paint the frame, flip the doors and paint the other side.  We completed this process 3 times.
6.  Cure, cure, cure, cure, cure.
7.  Paint pulls - we used Rustoleum spray paint in "Hammered Silver" - Daniel sanded and washed each pull and them gave each 2 coats of the spray paint.  After allowing the pulls to cure overnight, we reattached them to their respective doors and drawers. 
After allowing the recommended 72 hours to dry, we reinstalled everything.  If you look close at the picture below, you can see that we scraped about 4 inches of the popcorn around the top of the desk so we could adequately paint.  We will eventually scrape all the nasty popcorn, but for now, we scraped only where necessary.
 Take-aways:
  • Do your research, but recognize that your plan might fail.
  • What worked for someone may not work for you.  Your process should really vary depending on your cabinets.  When I painted the vanity in my bathroom earlier this summer, I didn't run into any of the issues that I did when painting the kitchen cabinets.
 
Downstairs bathroom vanity

  • Oil-based paint is smelling and sticky, but it does work. Just buy a few cheap brushes and throw them away post-painting.  
  • Don't cut any corners - if you think it needs another coat, give it another coat.  It will pay off in the long-run.
  •  Allow plenty of time to cure.  You'll kick yourself if you reinstall only to find out you bumped a door while installing. 


Whew, that's it!  Total time needed to complete - 2 weeks (including curing time).  The project is not for haters of messes and/or painting, but if you can dedicate a handful of hours each day to painting, it will be worth it.  I never would have attempted the project during the school year.  Thankful I did it, thankful it's done.  Ha.


And just to keep it real, here is what our kitchen looked like during the process:
 Oh my.
 It was a long two weeks.  Lots of eating out.
Stop by tomorrow for a few decorative updates!  Happy painting!

July 24, 2012

It's DONE!!!!!

Almost.

There are perhaps 3 things left to do before I can fully admit that the kitchen is finished (for now), but I just can't wait any longer.  We're SO pleased with the results.  And so sleepy.

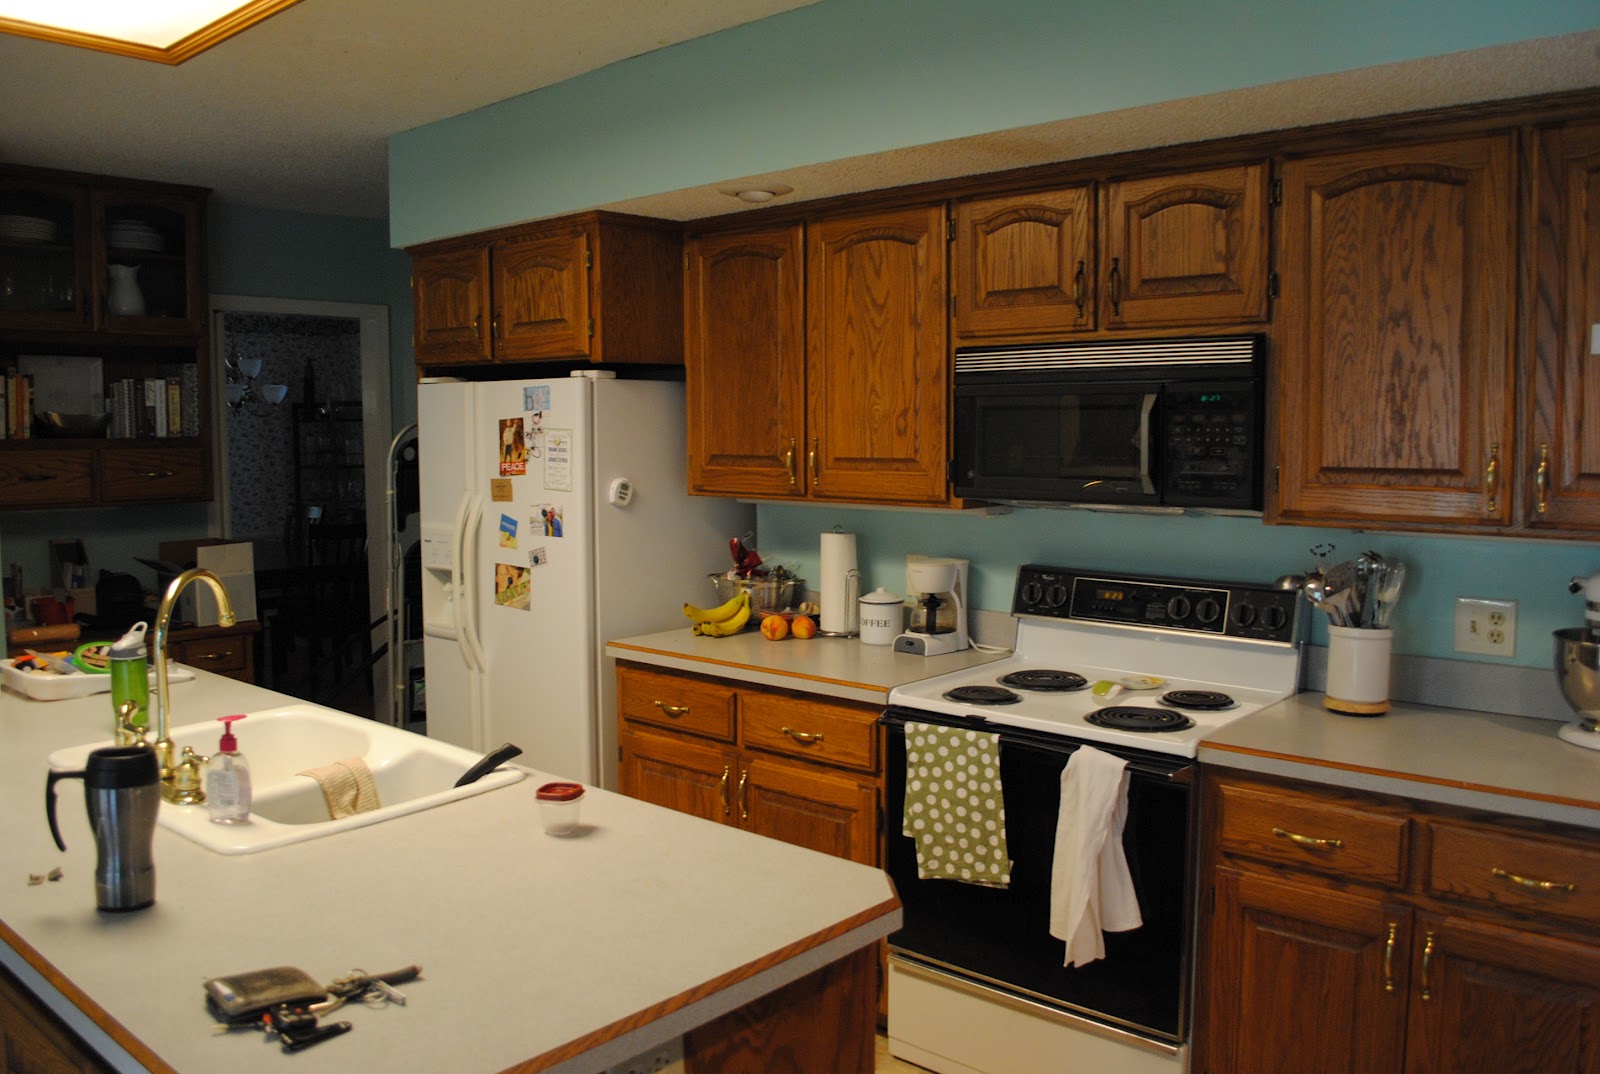
But before I show you the dramatic results, here is where we began.  And when I say "began," I mean before we even moved in.
 Holy honey oak!!  (As I've mentioned before, honey oak is not the worst thing on the planet...but it is simply not our style.)
 It's everywhere
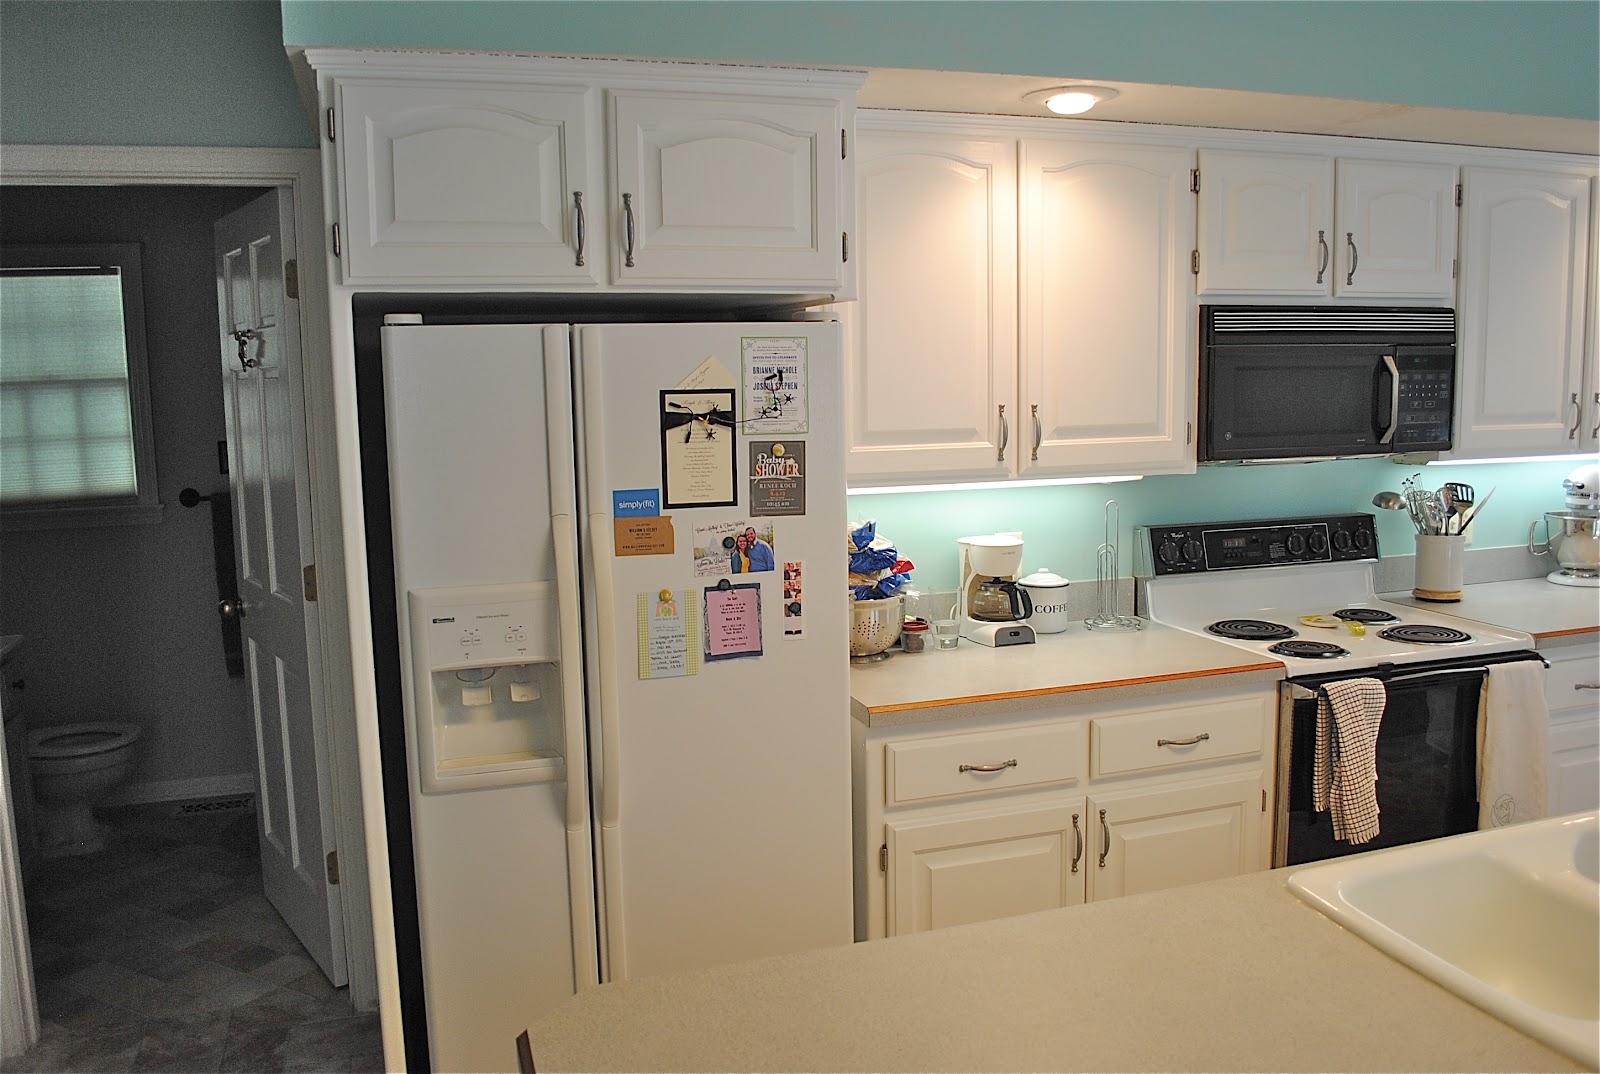
Seven months of planning later, here's the happiness that greets us every day.
 Crisp, clean, lovely, white.  (Ignore the almond outlet covers.  Someday...)
 So bright and chipper!
 And we LOVE how it looks next to the aqua walls.  Chills.
 Another view.  (Ignore the beast of a light fixture and the dark doors.  Another day...)
 Glass doors still need another coat of paint downstairs, so for now, we're rocking the open cabinets look.
 Aaaaaand we still need to re-install the little doors below the sink.  Those suckers are obnoxious.  Not that I spent any longer than 30 seconds looking at them before deciding that huzz needed to complete the removal task. 
 Now for a few deets.  We didn't purchase new hardware.  Even if we had scored a killer deal on hardware (like $2 or $2.50 a pop), we still would have spent nearly $150 or $200 on hardware.  Not awesome.  So we painted it.  Perhaps I'll explain someday our love of all things Rustoleum.  Seriously.  For $14 we had all new hardware.  Awesome.
 We did, on the other hand, purchase new hinges (mainly because we realized painting the hinges would result in extreme anger from yours truly due to the continual scrape of paint every time a door was opened).  We felt like we had two choices: (1) not order new hinges and eat out for every meal during the remainder of our tenure at our abode OR (2) purchase new hinges.  I think you know where this is going.

Initially, we thought hinges were going to run us $7 each.  Yikes!  No fun.  (Especially no fun considering we have 52 hinges.  Vomit.)  But Dansy, in his infinite knowledge of the interwebz, scored 54 hinges (accidentally ordered 2 extra) for $117 (including tax and shipping).  And a great shout was heard from Birchwood Lane.  !!!!!!!!!  And we're daaaaang pleased.  And I reorganized my baking cabinet.  Score.

 And, just so you have the full effect of the brightness of this room (and our new couch!), here is where we log a solid number of hours.  A great deal of naps have been had here.  And all are happy.

How about a few numbers? Dad, you're going to love this.
Hours spent on project:  over 100 (it is nauseating calculating any higher)

Painting helpers:  3 (Special shout-out to moms for logging countless hours priming - now that is a good story.  I promise I'll tell you soon.  And thanks to Cheri who drove from Wichita to spend a day off getting paint in her hair and hearing me complain about the mess I got myself into.  And many thanks to Dans for letting me go through with this astronomically larger than life project and for doing the things I didn't want to do.)

Miscellaneous helpers: 3 (Dad, thanks for loaning us painting equipment.  Brett, thanks for letting us borrow your sander for far too long.  And Tammy, thanks for offering to feed us over and over again.  You guys are all great.)

Cost:
Hardware paint:  $14
Hinges:  $117
Liquid sandpaper (aka: my new bestie):  $15
Primer:  $65 (latex) + $39 (oil-based)
Paint:  $100 (we used a little over 1 gallon)
Brushes, rollers, miscellaneous supplies: $50
Total:  $400
We could have saved close to $100 had I not thought that I knew more than the pros and decided to prime with latex paint.  Silly me.  The good news is that I have a few more painting projects up my sleeve, and now I had loads of extra primer.  It all works out in the end.

Hinges:  52

Pulls:  38

Door fronts:  26

Total coats of paint per surface:  4

Trips to Benjamin Moore over a 3 day period:  12 (I'm not even kidding.)

Strands of hair still covered in oil-based paint:  5

So even though it's not 100% finished, we're happy.  Really happy.  Would we do it again?  .........Yes.  But we would definitely listen to the pros.  Ha.  Check back later this week for the products we used and tales of the process.  

Now I'm going to go take a nap. 


July 11, 2012

OH MY WORD.

There is no better phrase to sum up the last 7 days than "oh my word."  Seriously.  So far, close to 75 man-hours have been logged as we have trudged through the storm named "repainting our kitchen cabinets."  Has it been worth it?  We certainly hope so, but only time will tell.  Hopefully (fingers crossed), the death trap that is our kitchen will be put back together this weekend.

Here's where we started (excuse the slight disaster...I nearly forgot to take "before" pictures, so I just snagged a few the morning before we began).
 PS - if you're a lover of all things natural wood, please avert your eyes.

 Soooooo much honey oak.
 And almost as much dingy brass.
 And a happy huzz.
 Making room for "distant gray".
 Ideally, this will be a usable space someday.
 My beloved cookbook collection.
 I'll provide more accurate stats (and a whole heckuva lot of details and exaggerations) later, but for now, this is how far we've come:
 We've been living in this chaos for a week (#firstworldproblems).
 And it's all about to come to an end. Can't. Wait.
Tonight's checklist:  spray paint hardware, do final coat on tops of doors, purchase those little clear things that you put on the backs of doors and drawers to prevent them from sticking to the frame (that's a technical term), and SIT.  We be sleepy.  But excited.

More deets (and pictures!!!) to come!

July 1, 2012

Le Tour de Apartment

Currently, our main floor is in shambles due to a bathroom quasi-remodel that is half-done and our upstairs is a disaster due to the installation of a 5-minute fan that ended up taking 45 minutes...and then we decided to call LeRoy, our resident electrician.  I have nothing house-related to show that is remotely interesting, SO instead, how about a tour of our ex-apartment?  Just for nostalgia's sake.

Let's get started!

Guest room, post "mom is here to help me clean it up."


 And yes, that is a freezer  in our guest room. 


 Living room, duh.


 Our room.

 My favorite red dresser.


 And the baby-size kitchen.


And there you have it!  Tiny, tiny space.  The only thing I miss about our tiny space is that it took only 30 minutes to clean the whole place.  HOWEVER, I never felt like it was actually clean.  It was always a little dingy and dirty.  Yikes.

This week's projects include finishing the downstairs bathroom, paying someone to install the ceiling fan, and beginning the epic painting project that is the kitchen cabinet.  Wish me luck!!!